


Galen is an open source layout testing tool for software applications, which helps us test the look and feel of the application. The idea behind using Galen is to simplify layout testing where we won’t need to manually test an application for UI based issues. Galen can also be used to automate UI regression.
Currently Galen is a fully functional testing framework with rich reporting and test management system. It supports both Javascript and Java. It has its own syntax called Galen specs for describing the positioning and alignment of elements on a web page. It uses Selenium to interact with the page objects.
Here's a Galen framework tutorial that'll help make sense of the tool, and all the concepts involved.
We also have a quick video which will take you through all the steps and concepts explained in this blog.
Responsiveness of a Browser
The framework is designed to test the responsiveness of an application. It is easy to set up Galen to test the responsiveness of an application for different browsers and for multiple devices. Galen initiates a browser, and resizes it to a defined resolution which can be passed as a parameter when writing the tests. It can then test the responsiveness according to the specifications defined.
Runs on Cloud and Selenium
Galen has been made flexible enough to run on third-party cloud services such as BrowserStack and Sauce Labs. The tests can also be run using Selenium Grid. This would help save time when running tests on multiple devices.
Installation
Prerequisite
For executing Galen the Java version should be 1.8.
NPM based installation
For npm based installation, just type in the command sudo npm install -g galenframework-cli
Manual Installation
Install on OS X and Linux
- Download the archive from Download Page and extract it in any directory. Go to the extracted directory of the galen and execute the following command: sudo ./install.sh
- To check whether Galen is successfully installed execute the following command: galen -v.
The above command should print the installed version of Galen within your system.
Configuring Galen
To configure Galen, create a project directory and inside that, execute the following command: galen config
This would basically create a galen.config file in your project directory which would contain the configurational parameters for Galen. You need to configure the ChromeDriver for Chrome and the GeckoDriver for Firefox. To execute your tests in headless mode you can also execute it using PhantomJs.
To configure the drivers use the following syntax:
$.webdriver.gecko.driver=Drivers/geckodriver
$.webdriver.chrome.driver=Drivers/chromedriver
$.phantomjs.binary.path=Drivers/phantomjs/bin/phantomjs
Nota Bene
In case of drivers, instead of using the driver executables for chrome, phantomjs, and firefox, you can also install them in your local machine.
Since I am using a Mac I will be using Homebrew to install the drivers.
1. To execute your tests on firefox you will need the geckodriver. Gecko driver can be installed by using brew install geckdriver. This will install the latest stable version of gecko driver in your system.
2. To execute your tests on chrome you will need the chromedriver. Chrome driver can be installed by using brew install chromedriver. This will install the latest stable version of chrome driver in your system.
3. To execute your tests headlessly you will need the phantomjs driver which can be installed in your system using brew install phantomjs.
Once this is done you just need to give the path of the driver in your galen.config file. This will look something like this:
$.webdriver.gecko.driver=/usr/local/bin/geckodriver
$.webdriver.chrome.driver=/usr/local/bin/chromedriver
$.phantomjs.binary.path=/usr/local/bin/phantomjs
Modus Operandi
Galen operates in the following manner.
- Galen opens a page in a browser
- Resizes the browser to a specific size
- Tests the layout with Galen specs
In case the page is not directly accessible, Galen allows you to perform some operations on the website first. As it is based on Selenium, all operations related to clicking, typing, injecting client-side JavaScript can be done very easily.
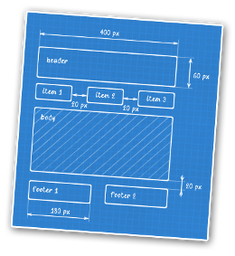
Galen specs is the language with which the specifications of responsiveness can be defined as per different devices. The following code snippet will give an idea of how easy it is to implement the page specifications using Galen.
= Main section =
header:
height 100px
inside screen 0px top
width 100% of screen/width
menu:
height 50 to 60px
width 100% of screen/width
below header ~ 0px
search-button:
inside menu 20 to 50px left, 0 to 10px top
@on mobile
search-button:
width 100px
@on desktop
search-button:
width 150px
Project Structure
This would be the possible project directory structure.
1. Drivers directory consists of the browser kits required to execute a browser. This directory includes GeckoDriver, ChromeDriver and PhantomjsDriver.
2. PageInteractions directory contains all the JavaScript related logic related to page interactions.
3. Reports directory consists of all the reports executed on Cross Devices, Cross Browsers and specific to only a single device.
- Cross_Browser_Specs_reports which has the reports for Cross Browsing based test executions
- Cross_Device_Specs_Reports which has the reports for Cross Browsing and Cross Device based test execution
- Uni_Specs_Reports which has the reports for tests executed specific to a single device
4. Specs directory consists of the Galen specifications and has two classifications:
- Cross_Specs which essentially focuses on the characteristics on multiple devices
- Uni_Specs focuses on the characteristics of a single device
5. Test_Suites directory consists of the test suites required to execute all the tests and has two classifications.
- Cross_Browser which focuses on tests written for multiple browser and multiple devices
- Cross_Devices which focuses on tests written for multiple devices only specific to the default browser mentioned in the galen configuration
- Uni_Devices which focuses on tests written specific to the device that's specific to the default browser mentioned in the galen configuration only
6. galen.config consists of all the configuration related parameters required to execute Galen.
Galen Specs
Galen specs language is quite flexible and gives the opportunity to express exactly how you want your website to behave on different devices and on different browsers. There are two main parts in page specs file:
Object definition
Each Galen spec file normally starts with object definition. It is the place where you give names to page objects and also define the so called locators – the way for Galen to find element on test page. The available locators are:
- id – searches for object by id in DOM
- css – uses CSS selectors to find objects
- xpath – uses XPathexpressions
The object definition is defined with @objects keyword and all objects are declared below it. The object definition can be defined as follows:
@objects
header css div.ss-header-container div.ss-header
header-logo css div.ss-header-left div:nth-child(2) a img.cgu-logo
carousel id hero-carousel-mob
Object Specs
The object specs consists of the specifications of the page object. You can consider your object specs to be an assertion. Object specs are the validation metrics for the page objects. Based on the object specs the validation for the visual regression is carried out.
header:
height 50px
width 375px
header-logo:
height 33px
width 41px
Sections and Tagging
Sections are declared with = symbol in the beginning and end of the line. Also in Galen you can have multiple sections within each other. This allows you to structure your test code so that it is easier to read the specs.
= Header section =
header:
height 50px
width 375px
header-logo:
height 33px
width 41px
Quite often you need to declare different specs for different conditions (e.g. various devices like mobile, tablet, desktop etc.). You can specify tags in your spec file so that it is easier to manage your layout testing. You can wrap all your checks inside @on statement like this:
@on mobile
header-mobile:
height 50px
width 375 to 410px
@on desktop
header-desktop:
height 40px
width 1024px
Absent
One of the simplest specs in Galen. It doesn’t take any parameters. It is used to check that the element is either missing on page (in HTML code) or it is present but not visible (e.g. style display:none)
hamburger:
absent
Inside
Spec inside verifies that an element is visually inside another element.
site-nav-button:
inside site-nav 10px top
Ranges
The basis for all specs is a so called “range”. Range is a format of defining boundaries for any value. With the range you may express that the expected value should be exactly ‘0’, or greater than ‘0’, less then ‘0’ etc. For example
# The value between range
width 375 to 400px
# Greater than
width > 40 px
# Less than
width < 40 px
# Greater than or equals
width >= 40 px
# Less than or equals
width <= 40 px
# Approximate
width ~ 100 px
Galen Test Suite
To give more flexibility and maintainability to the user, Galen came up with another simple format for defining test suites. Test suites are just a set of pages that need to be checked with the appropriate test specs. But there is something more in there which gives a lot of power in testing. Apart from this it also makes the test execution much smoother.
The aim of deploying a test suite is mainly to carry out continuous executions of all the test specification without human intervention and Galen provides such ease through its deployment of the test suite. The entire specification of the application can be executed at one go.
Basic Format
The basic format of the test suite looks something like this.
Checking the responsiveness for business section on ${device}
Business section | http://${domain}/business ${resolution}
wait 10s until exist "css: div#nebula_div_btn"
check ././Specs/Uni_Specs/CGU_Business.gspec
Defining the basic format of a test suite in Galen takes place in three simple steps:
- Defining the name of the test. For this test we have also specified to run these against a specific domain and platform with the browser resize resolution.
- If there are any conditions that needs to be provided or if you need to call an external JavaScript file to define the Page Interactions that can be written onto the second step.
- In the third step you define the Page Action which basically tells to check the page specification for the particular url defined.
Passing JavaScript variable to a spec file
You can pass some data from your tests into your spec file so that they are accessible from JavaScript statements. To do this you need to pass it via --VvariableName variableValue argument. For example:
Home page test
http://example.com 1024x768
check homepage.gspec --include desktop --Vusername John
Variables
It is always nice to put commonly used data in variables. e.g. we can put domain name in the variable. This can be done with special instruction: set
@@ set
domain www.cgu.com.au/insurance
resolution 375x667
set device Iphone6
@@ groups Business_Section
Checking the responsiveness for business section on ${device}
Business section | HTTP://${domain}/business $ {resolution}
wait 10s until exist "css: div#nebula_div_btn"
check ././Specs/Uni_Specs/CGU_Business.gspec
Or you can also use variable reference when defining another variable.
@@ set
domain example.com
base_url HTTP://${domain}/
Home page on a small mobile device
${base_url} 320x600
check homepage.gspec --include "mobile,all" --exclude "nomobile"
Replacing Page URL in reports
Once the test is done Galen will generate a HTML report and use the browser factory that you defined in your spec. If you would like to change the way it appears there you can use ‘|’ symbol like in the following example:
Checking the responsiveness for menu in the business section on ${device}
Breadcrumb in Business section | HTTP://${domain}/business ${resolution}
In the end galen will use everything before ‘|’ in HTML report. So only the Breadcrumb in Business section part will be shown.
Parameterization
If you want to run tests against different devices or different browsers, you can write a data table and mark the test with “parameterized” special instruction. This can be done using the @@ parameterized annotation.
@@ parameterized
| deviceName | tags | size |
| Mobile | mobile | 320x600 |
| Tablet | tablet | 640x480 |
| Desktop | desktop | 1024x800 |
Home page on ${deviceName} device
http://example.com/ ${size}
check homepage.gspec --include "${tags}"
As you can see, we defined a data table where the first row is used as a header with names of parameters. Using the example above Galen will run test 3 times with all listed parameters. In the report you will see the tests runs like this:
Home page on Mobile device
Home page on Tablet device
Home page on Desktop device
We can also parameterize the already existing parameterized tests in the suite. This can be done in the following way:
@@ parameterized
| browser |
| firefox |
| chrome |
| ie |
@@ parameterized
| deviceName | tags | size |
| Mobile | mobile | 320x600 |
| Tablet | tablet | 640x480 |
| Desktop | desktop | 1024x800 |
Home page on ${deviceName} device in ${browser} browser
${browser} example.com ${size}
check homepage.gspec --include "${tags}"
Tables
Tables comes in handy when we want to parameterize all the tests running within the test suite. It would look something like this:
@@ table devices
| deviceName | tags | size |
| Mobile | mobile | 320x600 |
| Tablet | tablet | 640x480 |
| Desktop | desktop | 1024x800 |
@@ parameterized using devices
Home page on ${deviceName} device
HTTP://example.com/${size}
check homepage.gspec --include "${tags}"
@@ parameterized using devices
Login page on ${deviceName} device
HTTP://example.com/login ${size}
check login.gspec --include "${tags}"
You can also merge tables inside your parameterization code block:
@@ table deviceList_A
| deviceName | tags | size |
| Mobile | mobile | 320x600 |
| Tablet | tablet | 640x480 |
| Desktop | desktop | 1024x800 |
@@ table deviceList_B
| deviceName | tags | size |
| Mobile 2 | mobile | 360x600 |
| Mobile 3 | mobile | 400x600 |
| Mobile 4 | mobile | 500x600 |
@@ parameterized using deviceList_A, deviceList_B
Login page on ${deviceName} device
HTTP://example.com/login ${size}
check login.gspec --include "${tags}"
Disabling a test
A test can be disabled in Galen using the @@ disable annotation.
@@ disabled
Home page
HTTP://example.com 640x480
check homepage.gspec
Login page
HTTP://example.com640x480
check homepage.gspec
Test Groups
Since version 1.6 you can tag your tests with groups. That will allow you to group your tests in HTML report and choose which group to run in command line. To mark a specific test as a group just use groups keyword:
@@ groups Business_Section
Checking the responsiveness for business section in ${browser} browser on ${deviceName}
selenium ${browser}http://${domain}/business ${size}
wait 10s until exist "css: div#nebula_div_btn"
check ././Specs/Cross_Specs/CGU_Business.gspec --include "${tags}"
Waiting for Dynamic Content
There may be a possibility that we have to apply wait for any element to be loaded in the DOM before the test procedure can be carried forward. Timeout can be classified in two ways:
Strict Timeout: You can define timeout in minutes or seconds. For example
Home page test
HTTP://example.com640x480
wait 10s
check homepage.gspec
Condition Based Timeout: For this way of waiting you need to provide a locator (css, xpath or id) for an element and a condition for it. There are 4 conditions that could be used in wait action:
- element appears in DOM
- element is removed from DOM
- element becomes visible
- element gets hidden
In case the condition fails, Galen will throw an exception and interrupt the test. For example:
@@ groups Business_Section
Checking the responsiveness for business section in ${browser} browser on
${deviceName}
selenium ${browser} HTTP://${domain}/business ${size}
wait 10s until exist "css: div#nebula_div_btn"
check ././Specs/Cross_Specs/CGU_Business.gspec --include "${tags}"
Would love to know if you have any further thoughts or insights on Galen, or about this Galen framework tutorial. Just drop a line the comments below and we can start a discussion.