


What is an Emulator?
An Emulator is an application that emulates real mobile device software, hardware, and operating systems, allowing us to test and debug our application. It is generally provided by the device manufacturer. Mobile emulators are free and provided as a part of SDK with each new OS release. As a developer or a tester, you can configure the emulator to closely resemble the devices on which you plan to deploy your application.
The emulator window consists of a device screen on the left and phone controls/keyboard on the right. The device screen initially displays ‘ANDROID‘, and then displays the graphical logo, while the Android platform associated with the AVD is initializing.
What is AVD Manager?
AVD Manager is a tool to create and manage Android Virtual Devices(AVDs), which define device configuration for the Android Emulator. Before you can actually run an emulator, you need to install the Android SDK on your machine and define an AVD, which defines the hardware characteristics of the emulator. You can define things like the device RAM, whether there is touch screen and/or keyboard, camera support, audio playback support, etc. You can create several AVDs to test your device on several virtual devices.
How to Create an Android Virtual Device?
Once installation of all the prerequisites are done, we need to launch the SDK Manager to download relevant files to create an emulator and run the virtual device.
- In command line(cmd), type in android sdk. It would open the SDK Manager for you to download the relevant files
- In the SDK Manager select the files as shown below. This will help you create a virtual device
There are two ways to create Android Virtual Devices for mobile testing:
- Using Command Line
- Using AVD Manager
Creating a New Android Virtual Device using AVD Manager
The first step is to launch the AVD Manager and for that, there are a number of options you can follow:
- Launch AVD Manager using Program Menu : Go to Start → All Program → Android SDK Tools → AVD Manager
- Launch AVD Manager using Command Line : Go to Run and type cmd to open command prompt window. Type: android avd
- Launch AVD Manager from folder location : Browse to Android SDK folder and Double-click on AVD Manager.
Either of the above ways, it would open the Android Virtual Device Manager, which would help you create the virtual devices. The AVD Manager main screen shows one default virtual device, which is Nexus 5.
1. Click on Create button to create a new AVD

2. A pop up will open, follow the below screenshot for the values. In case you are simulating a specific device, you might want to name it as such. For example NexusSix-4.4 refers to an AVD that simulate Nexus-SIx which runs on Android 4.4.2 version.
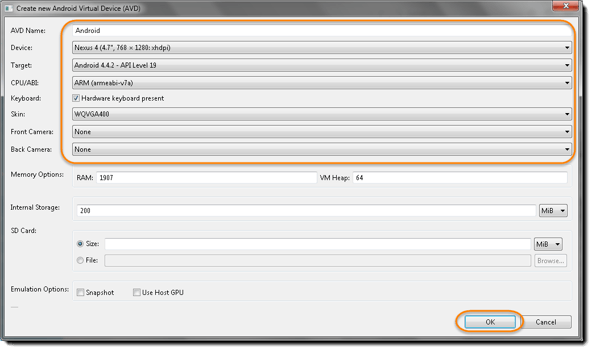
In this test I choose a very generic name Android to keep it simple.
Note: You can play around with different configurations for your virtual device.
3. Click on OK to proceed with the save changes.
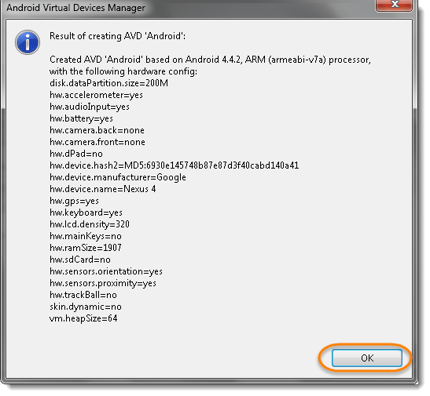
4. After you complete above steps, the emulator will be displayed under the Android Virtual Devices tab, configured on the AVD Manager. Now select the AVD name and click on Start on the right.
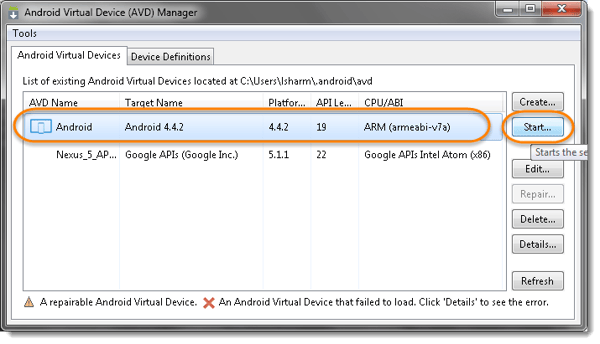
5. This would launch the pop up with few options, you may choose as you want. Once done, click on Launch, this will launch the emulator.
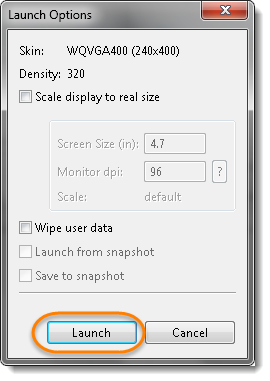
- Scale display to real size: This causes the resolution of the emulator’s display to be scaled to match the screen size
- Wipe user data: This would wipe any previous app installation you have done and would launch a plain fresh emulator
- Launch from snapshot: This causes the emulated device to start from a previously saved snapshot of the device’s state. The emulator launches much faster when launched from a snapshot.
- Save to snapshot: This causes the emulated device’s state to be saved to a snapshot upon device exit
6. Emulator will launch, it would take few minutes to display the Home Screen of the virtual android device. The time taken is actually equal to the switch on time on the real mobile device.
Note:
- You can use the command ‘adb devices‘ to see if the adb is detecting the emulator. This basically completes the Android SDK installation part.
- If ANDROID logo appears for more than 15-30 minutes, something has probably gone wrong. Reboot your computer, start AVD Manager, delete our created ‘Android’ AVD, recreate this AVD, and relaunch new AVD.
The emulator window launched with 5554:Android in its title bar. Value 5554 identifies a console port that you can use to query and control the AVD’s environment. Android supports a maximum of 16 concurrently executing AVDs, where each AVD is assigned an even-numbered port number that starts at 5554. It means that we can initialize more than one AVD at the same time and can test the app with parallel execution.
Creating an Android Emulator using Command Line
Android Emulator can be configured differently for simulating different android devices. With the help of AVD configuration, Android Emulator can simulate:
- Target platforms versions
- Screen sizes
- Solutions
- Input methods
- Hardware configurations
- External storage sizes for SD card
Although there are a good number of default device configurations present in AVD Manager, if you have any particular device in mind that you want to emulate, you need to create an AVD that resembles the features of your target device. For example, you need to know the screen size and resolution and so on.
Creating Default Device Definition
1. Go to Device Definitions tab and select one of the presets and click ‘Create AVD’
2. Every default device will provide you some preset AVD and that can be changed according to your need
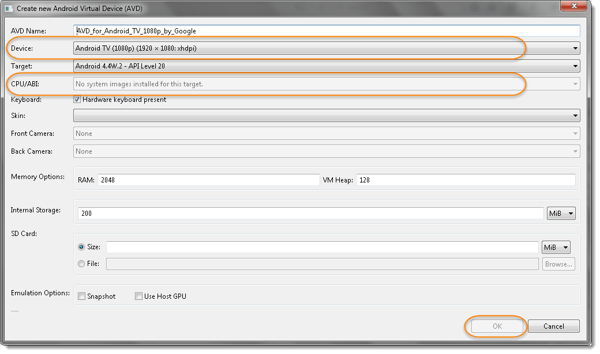
Note: Notice that the OK button is disabled, just because under CPU/ABI it says that “No system Images installed for this target“. To avoid this, select different Device configuration from Device & select any skin or select none for skin and proceed.
Below are the list of optional and mandatory settings:
- AVD NAME: Choose a name for the AVD like NexusSix-4.4 that refer to your device configuration
- Device: Select the AVD resolution as per the device options
- Target: Select the Android version / Test Environment or Target Platform
- CPU/ABI: Select Intel Atom (x86) for 32-bit and ARM (armeabi-v7) for 64-bit.
- Keyboard: Select this box to use the keyboard in the AVD
- Skin: Select this box to get the hardware buttons
- Front Camera: If the system have a webcam, that can be used with AVD
- Back Camera: If the system have a webcam, that can be used with AVD
- Memory Options: Set RAM & VM Heap for the device according to your need
- Internal Storage: Set this as per your need and Select GiB/MiB from the drop down
- SD Card: Set this as per your need and Select GiB/MiB from the drop down
- Emulation Options
- Snapshot : Select this to persist, it lets you quickly start the emulator after the first startup.
- Use Host GPU: Select this to use the computer graphics
3. After you complete the above steps, the emulator will be displayed under the Android Virtual Devices tab, configured on the AVD Manager. Now Select the newly added AVD name and click on Start on the right.
4. This would launch the pop up with few options, you may choose as you want. Once done click on Launch, this will launch the emulator.
- Scale display to real size: This causes the resolution of the emulator’s display to be scaled to match the screen size
- Wipe user data: This would wipe any previous app installation you have done and would launch a plain fresh emulator
- Launch from snapshot: This causes the emulated device to be started from a previously saved snapshot of the device’s state.The emulator launches much faster when launched from a snapshot
- Save to snapshot: This causes the emulated device’s state to be saved to a snapshot upon device exit
Once done, Emulator will launch. It would take few minutes to display the Home Screen of the virtual Android device.
Creating a Custom Device Definition
In case the available device definitions do not match the device type you’d like to emulate, you can create a custom device definition for your AVD:
1. If the AVD manager is opened, go to Device Definitions
2. Click on Create Devices.
3. The Configure Hardware Profile window will display and it will allow you to specify various configurations such as the screen size, memory options, input type, and sensors.
Note: Once all the information is filled properly, Create Device button will get enabled and you may proceed then.
4. After you complete above steps, the emulator will be displayed under the Device Definition tab, configured on the AVD Manager. Now Select the newly created AVD name and click on Create AVD on the right.
Automation using Android emulator
- Get Emulator Platform Version
- Unlock Android emulator screen
- Go to Settings. You will find About Phone under settings.
- Go to About Phone. It will show you Android version
- Verify calculator App Is Available In Emulator
We are going to run an Appium test for calculator application so it should be there in emulator. Generally, calculator app will be already installed in emulator. To check if it is installed or not,
1. Unlock emulator
2. Verify if there is an application with name Calculator
3. Get app activity and package name. We need launcher activity and package name of calculator app. Activity and package name of calculator app for me are:
- Package name : com.android.calculator2
- Activity name : com.android.calculator2.Calculator
4. Create Appium Test Script In Eclipse. Now we are ready to create and run our first Appium test on Android emulator for calculator application. I have prepared Appium test script as below. I have used RemoteWebDriver of Selenium Webdriver to launch app with required capabilities.
5. To start an instance of the emulator from the command line, navigate to the tools/ folder of the SDK. Enter emulator command like this: emulator -avd <avd_name> [<options>]
So that was all about performing Appium testing on emulator. In case you are just starting off with mobile application testing, you can explore our list of the best tools for mobile test automation.