


IoT implementation and real-time sensor data monitoring with the cloud.
IoT is the next frontier of enterprise connectivity. From manufacturing to healthcare to smart cities, IoT is bringing about a sea change in how we gather, analyze, and otherwise work with data.
Let's take a look at the official definition provided by Wikipedia.
"The Internet of Things (IoT) is the network of physical devices, vehicles, home appliances, and other items embedded with electronics, software, sensors, actuators, and connectivity which enables these things to connect and exchange data, creating opportunities for more direct integration of the physical world into computer-based systems, resulting in efficiency improvements, economic benefits, and reduced human exertions."
In simple words, an IoT device is a micro-controller connected with a sensor, and has the capability to communicate over the internet.
What’s the business value of IoT?
The number of IoT devices increased 31% year-over-year to 8.4 billion in 2017 and it is estimated that there will be 30 billion devices by 2020. The global market value of IoT is projected to reach $7.1 trillion by 2020.
Industries where IoT is being widely deployed:
- Wearables
- Home automation
- Robotics
- Automobile
- Healthcare
- Agriculture
- E-Commerce
Are you happy with Amazon's same day delivery? Say thanks to IoT devices. Yes, Amazon is using IoT integrated machines for their "Smart Warehouses".
Here's one more -
A global cleaning solutions company introduced its intelligent laundry dispensers. The system provides real-time and remote visibility into resource consumption and process automation. Energy and water consumption, chemical accuracy, machine downtime and day-to-day operational costs can be closely monitored, to prevent costly disruptions and errors within laundry operations, by using IoT devices in their machines. The IoT powered dispenser connects to any mobile device to give teams visibility of the entire wash process together with actionable insights.
So, an IoT device acts as an agent that engages in physical activity of a process to gather relevant data. This information is then leveraged to ensure smooth processes, predictive maintenance, generate data-driven decisions aimed at enhancing and evolving a business process.
How do IoT devices communicate?
Here’s a look at the normal communication models for IoT:
- Device-to-Device Communications
- Device-to-Cloud Communications
- Device-to-Gateway Mode
- Back-End Data-Sharing Model
In essence, all IoT communication models are designed to give users better access to an IoT device and its data. The device and the data collected therein is clearly a valuable resource. Adding to this, a cloud web is the most popular platform to utilize this data in real time. Besides this, a data stored on the cloud opens up possibilities like API integration, database integration, notification alerts and more.
In this piece, I am going to demonstrate a Device-to-Cloud communication model using AWS and Python.
Here’s a look at the basic concept involved in this communication model.
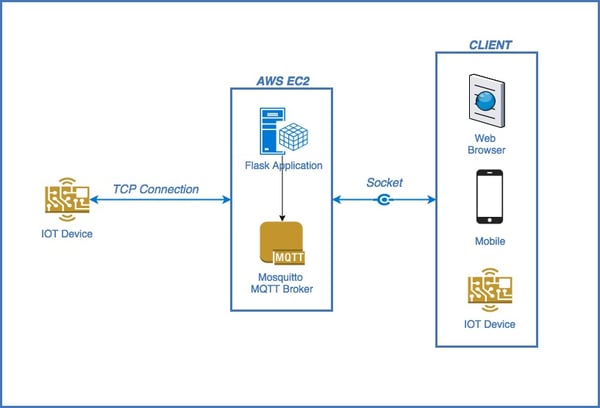
I created a small web application which shows the real-time data from the IoT on the web browser, using AWS cloud.
Let’s dive in.
Requirements
For this demonstration, we require a
- microcontroller with WiFi module
- general I/O pins
- battery powered or usb powered IoT device
You might be thinking of Raspberry Pi uptil now, but it’s specification are a bit of an overkill for this demo, and almost none of its features will be utilized under this demo. Here’s why:
|
Features of Raspberry Pi-3 |
Do we need it |
|
CPU - 1.2GHz 64-bit quad-core ARMv8 |
More than what we need |
|
RAM - 1 GB |
More than what we need |
|
WiFi 802.11 b/g/n |
|
|
Bluetooth 4.1 |
Not required |
|
4 USB ports |
Not required |
|
40 GPIO pins |
Not required |
|
Full HDMI port |
Not required |
|
Combined 3.5mm audio jack |
Not required |
|
Camera interface |
Not required |
|
Display interface |
Not required |
|
Micro SD card slot |
Not required |
|
Video Core IV 3D graphics core |
Not required |
What I used instead was the NodeMCU, with the following specifications
- CPU - ESP8266(LX106)
- Memory - 128KB
- Operating System - XTOS
- Storage - 4MB
- WiFi 802.11 b/g/n
- 30 GPIO pins
Honestly, choosing an IoT device completely depends upon your specific requirements. It’s definitely not a Raspberry Pi vs NodeMCU vs Arduino IoTdevice war. There are many other IoT devices available on the market to work with.
So, NodeMCU module is the best fit for our requirement. Now, let's dive into the hardware and software part of this project.
Hardware used:
- Nodemcu ESP8266
- DHT11 Temperature Sensor
- 3 Pin Connector
- Micro USB cable
Software/Framework used:
- Arduino UNO
- Python Flask
Let's build
Step 1
Connect the DHT11 to NodeMCU. Pin connection of DHT11:
- '+' - 3v3 (Voltage)
- '-' - GND (Ground)
- 'out' - D2 (Data)
Step 2
Connect the NodeMCU to your computer via a "Micro USB cable" and setup Arduino IDE.
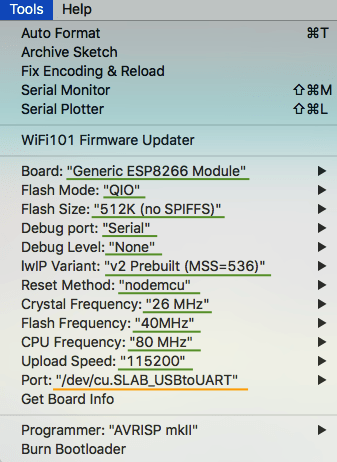
Note that the port may be vary on different OS, so just find out on which port your device is connected to.
Step 3
- Install dependent libraries in Arduino IDE
- Sketch -> Include Library -> Manage Library.
- Search and add the following libraries
- DHT
- Pubsub client
- ESP8266WiFi
Step 4
Write some code for your microcontroller and upload the code into it. Here’s mine
|
#include <DHT.h> #include <ESP8266WiFi.h> #include <PubSubClient.h> #define DHTPIN 4 #define DHTTYPE DHT11 DHT dht(DHTPIN,DHTTYPE); struct dht11 { float humidity; float heatIndex; float temp; }; struct dht11 sensor_data; int led_counter = 0; int read_sensor(struct dht11* data); // Update these with values suitable for your network. const char* ssid = ""; const char* password = ""; const char* mqtt_server = ""; const char* usr = ""; const char* pwd = ""; int timeSinceLastRead = 0; WiFiClient espClient; PubSubClient client(espClient); long lastMsg = 0; char msg[200]; int value = 0; int analog_pin = A0; void setup() { pinMode(BUILTIN_LED, OUTPUT); // Initialize the BUILTIN_LED pin as an output pinMode(analog_pin,INPUT); Serial.begin(115200); setup_wifi(); client.setServer(mqtt_server, 1883); } void setup_wifi() { delay(10); WiFi.begin(ssid, password); while (WiFi.status() != WL_CONNECTED) { delay(500); Serial.print("."); } Serial.println(""); Serial.println("WiFi connected"); } void reconnect() { while (!client.connected()) { Serial.print("Attempting MQTT connection..."); if (client.connect("<YOUR CLIENT ID GOES HERE>",usr,pwd)) { Serial.println("connected"); } else { Serial.println("try again in 5 seconds"); delay(5000); } } } void loop() { if (!client.connected()) { reconnect(); } client.loop(); long now = millis(); if (now - lastMsg > 2000) { lastMsg = now; if(read_sensor(&sensor_data)==0) { char str_temp[6],str_humidity[6],str_hi[6]; dtostrf(sensor_data.temp, 4, 2, str_temp); dtostrf(sensor_data.humidity, 4, 2, str_humidity); dtostrf(sensor_data.heatIndex, 4, 2, str_hi); snprintf(msg,100,"{\"temperature\":\"%s\",\"humidity\":\"%s\",\"heat_index\":\"%s\"}",str_temp,str_humidity,str_hi); Serial.println(msg); client.publish("<BROKER NAME GOES HERE>", msg); } } } int read_sensor(struct dht11* data) { data->humidity = dht.readHumidity(); data->temp = dht.readTemperature(); if(isnan(data->humidity)||isnan(data->temp)) { Serial.println("DHT11 Read Failed"); return 1; } data->heatIndex = dht.computeHeatIndex(data->temp,data->humidity,false); return 0; } |
Step 5
Install Configure the MQTT broker on the cloud. I am using AWS EC2 and Ubuntu 16.04LTS.
|
sudo apt-get update sudo apt-get install mosquitto mosquitto-clients sudo nano /etc/mosquitto/conf.d/default.conf ########################################################################### allow_anonymous false password_file /etc/mosquitto/passwd listener 1883 listener 1883 localhost listener 8083 protocol websockets certfile /etc/letsencrypt/live/mqtt.example.com/cert.pem cafile /etc/letsencrypt/live/mqtt.example.com/chain.pem keyfile /etc/letsencrypt/live/mqtt.example.com/privkey.pem ########################################################################### |
Step 6
Install Python Flask and use the code in this git repository.
Hola! Run it on your browser by entering public IP of your EC2 instance.
So there’s my two cents on how to make a web app to display data from sensor monitoring. This is, of course, my way of doing it and you can experiments with all the steps to come up with other methods to achieve these results.
Do let me know how your experiments go, and if you would do anything differently.