


I am currently working with a new security testing tool, ZAP. Previously, we were performing security testing with a paid tool. Some exploration of open source alternatives led us to the OWASP Zed Attack Proxy(ZAP).
ZAP is an open source tool which is offered by OWASP (Open Web Application Security Project), for penetration testing of your website/web application. It helps you find the security vulnerabilities in your application.
Why use OWASP Zed Attack Proxy?
Security testing is a vital part of web application testing. Here are the OWASP top 10 security threats that your website/application might face:
-
SQL injection
-
Broken authentication and session management
-
Cross-site scripting (XSS)
-
Broken access control
-
Security misconfiguration
-
Sensitive data exposure
-
Insufficient attack protection
-
Cross-site request forgery (CSRF)
-
Using components with known vulnerabilities.
-
Underprotected APIs
OWASP Zed Attack Proxy provides you with the ability to detect these threats. And it’s open-source, so you can use it free of charge.
Other than that, ZAP is an easy-to-use tool. Following are some more reasons for using ZAP:
-
Ideal for both beginners and professionals
-
Cross-platform - works across all OS (Linux, Mac, Windows)
-
Reusable
-
Can generate reports of the results
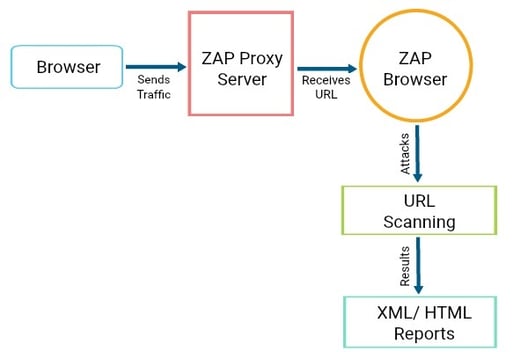
How does it work?
ZAP creates a proxy server and makes your website traffic pass through that server. It comprises of auto scanners that help you intercept the vulnerabilities in your website.
You can give specific Contexts (more on Contexts in a follow-up blog) for the data being screened, so as to avoid the unnecessary heavy traffic.
Some Terminologies
Session: A session simply means whatever you do in your ZAP, i.e. navigating through the website you want to attack. This is done so as to make ZAP browser understand the depth in which URLs are to be hit. You can also use any other browser like Firefox, by changing the proxy settings of that browser.
You can save your session in ZAP with the extension .session and reuse it.
Context: A context is the manner of grouping the URLs. When you need to hit the specific set of URLs with particular user(s), host(s) etc. in your website, a context can be created in ZAP which will ignore the rest and attack only the ones mentioned. This will help you avoid the unnecessary heavy data coming your way.
Attacks in ZAP: The purpose of this tool is to penetrate through the site, attack (hit) its URLs, scan the URLs hit, and check how prone the site is to the various risks/attacks.
Following are the types of attacks which ZAP provides:
-
Quick Attack: This helps you test the application using ZAP in the quickest way possible. Under the tab Quick Start, put the URL in the URL to attack field and click on the 'Attack' button.
ZAP will use its spider to crawl through the application, which will automatically scan all of the pages discovered. It will then use the active scanner to attack all of the pages. This is a useful way to perform an initial assessment of an application. -
Spider: It is used to automatically discover new resources/URLs on your website. It visits those URLs, identifies the hyperlinks and adds them to the list.
-
Active Scan: It is used to find the potential vulnerabilities by using the known attacks against the selected targets. It gets its targets from the spider attack.
-
There are more attacks which ZAP provides, other than the ones mentioned above; like AJAX Spider, Fuzz, Forced Browse Site etc.
Alerts: Alerts are thrown as results of attacks performed by Spider/Active Scan (or any other attack). Alerts are the potential vulnerabilities which are flagged as High, Medium, or Low according to the risk level.
Steps to Configure
Note: Use ZAP on a website only if you have permissions to perform testing on it, otherwise you might run into legal difficulties.
-
Download ZAP: Download the ZAP installer, according to your OS. I work on MacBook, so I have MAC OS/X Installer installed, but ZAP works same on all systems.
The only dependency is Java 7. If you don’t have Java installed in your system, first get that installed and then start with ZAP. -
Launch ZAP: Open the downloaded file (installer) and follow the instructions.
Start using!
Steps to Run
- Open / Launch ZAP
- Crawl the Browser: Either you can use ZAP’s browser or any other browser you want to.
For using any other browser, go to the browser and go to Tools Menu -> Options -> Advanced tab -> Network -> Settings -> Select Manual Proxy configuration - HTTP Proxy = 127.0.0.1 Port = 8080.
You just need to open the browser, hit the URL of your website (to be attacked) and crawl throughout the website. For crawling you can either use a tool or do it manually.
The more you crawl the website, the more URLs ZAP will be able to find. -
Create a session: It is not mandatory to save a session. But if required, a session can be saved and used again in future after you are done with scanning the application. This is done before you start working on ZAP. As soon as you launch ZAP, it asks you if you want to persist your session and you can select the option accordingly.
-
Create a context: To create a new context right click on the site (to be attacked) and click on “Include in context”.
Then click on “New Context” and a modal will open for you. In the context, you can add specifics like Users, Authentication, Hostname etc. as per your requirements.
You can always work with the default context available, but it is a good practice to make a new context of your own and include that in your site.
- Attack the site: To perform an attack, right click on the site (present under Sites), hover on Attack and click on the attack you would like to perform (eg. Spider… or Active Scan…).
As soon as you click it, the attack will start.
Generally, the recommended sequence is that:
- the site is crawled in the browser
- the context is set
- you run the Spider attack which gets you the URLs
- you run the Active Scan for those URLs
- Check the Alerts: Once the attack is completed, you can check the results in the Alerts tab. The alerts are classified as high, medium or low.
That’s all folks!
In this blog, I have just talked about what ZAP is, how it works, and how to configure and start using it.what ZAP is, how it works, and how to configure and start using it. Stay tuned for the next post, where we dive into a step-wise OWASP ZAP tutorial to on how to attack a particular website. Stay tuned.
Till then, you can check out our guides to a few other popular testing tools like Behat, Selenium, and A11ym. You could also view our webinar covering the mobile test automation tool, Appium.
And if you have used the OWASP Zed Attack Proxy and have some cool tips to share, do share in the comments below.