


With the Web APIs gaining traction at breakneck speed, it’s certainly crucial to implement security for all types of clients trying to access data through these services.
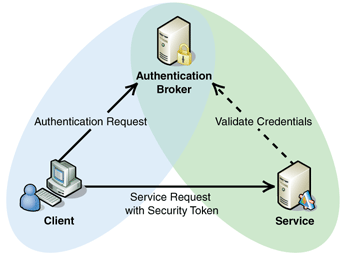
The most prominent approach is to authenticate the clients over HTTP using a signed token.
Simply said, a token is a piece of data which when combined with the right tokenization system, becomes a key player in securing your application.
Token-based authentication ascertains that every request made to a server is associated with a token, which is then validated by the server for authenticity to further respond to the request.
 Source: CodeProject
Given this, now users instead of entering their usernames and passwords at each subsequent request, send the token provided by the server to validate it and accordingly take action.
This blog will walk you through the advantages of token-based authentication over current authentication systems and how can you implement it in your application.
Let’s get into the details of JSON Web Token or JWT as we will be implementing JWT only in our application.
In its compact form, JSON web tokens consist of the following three parts separated by dots (.) -
- Header
- Payload
- Signature
Thus, a JWT typically looks like this - xxxxx.yyyyy.zzzzz
- Header - The header typically consists of two parts - the type of the token which is JWT, and the signing algorithm being used, such as HMAC SHA256 or RSA.
- Payload - The second part of the token is the payload which contains the claims. Claims are statements about an entity (typically, the user) and additional data such as expiration time of token, issuer, and others.
- Signature - To create the signature part, you have to take the encoded header, the encoded payload, a secret, the algorithm specified in the header, and sign that.
The output is three Base64-URL strings separated by dots that can be easily passed in HTML and HTTP environments while being more compact when compared to XML-based standards such as SAML
Advantages of JWT Over Session-based Authentication
HTTP is a stateless protocol i.e it doesn't store any information. So, every time when the user sends an HTTP request it's always treated as a new request. To overcome this, session-based authentication was put into use.
On the other hand, session-based authentication requires users to enter their credentials to allow severs to create a session object for the users and store that in a cookie.
Further, the session object would contain a sessionId which would also be there in the database. Now, for the subsequent requests, the server would validate the sessionId from the cookie against the one stored in the database.
Following are the few features that JWT offers-
- Stateless - JWT is a stateless protocol. It contains all the information in itself like header, expiration date, thereby no need to manage states like in session-based authentication system
- Performance - Since JWT generation and verification are taken care of by JWT library itself, there is no need to send an additional response to the server to match the sessionId
- Decentralized - JWT is good for microservices
- Scalability - JWT is quite scalable as it is stored on the client's sid, so no server memory is needed to separately store any JWT.
How To Implement JWT In Our Node.js Application
To implement JWT we require-
- jsonwebtoken module in our application
- Cookie-parser module - to parse the cookie
- Body-parser module - to parse the incoming request
We will be requiring all these modules in our application. For the sake of simplicity, instead of using databases, we will be creating a hardcoded user.
Now, to create a login route for letting users enter their credentials; which later would be compared to our static user object, and if both the entities match, a jwt token will be created using the sign method from the JSON web token library.
To create the token, we will use the username, secret key(which must be stored in an environment file), and expiration time of jwt token. Once it is created, we will be sending the cookie with the HTTPOnly option to be true. The cookie would prevent any XSS attack and httpOnly option would prevent any CSRF attack.
Now, to check whether our jwt works fine or not, we will send a get request to the welcome route. We will extract the token from the cookie of the user and use the verify method from the JSONwebtoken module. Depending on its validity, we will modulate our responses.
And, lastly, ensure that our server listens on Port 8080
The application can be easily tested through Postman as it supports cache.
const express = require('express');

const app = express();

const bodyParser = require('body-parser');

const cookieParser = require('cookie-parser');

const jwt = require('jsonwebtoken');


//Middlewares

app.use(bodyParser.json());

app.use(cookieParser());


const secret_key = 'please_store_secret_in_your_environment_file';


const user = {

    username: 'admin',

    password: 'password',

};


app.post('/login', (req, res) => {

    const { username, password } = req.body;

    if (!username || !password || user['username'] !== username || user['password'] !== password) {

        return res.status(401).send({ message: 'Username or password is incorrect' });

    }

    const token = jwt.sign({ username }, secret_key, {

        algorithm: 'HS256',

        expiresIn: Date().now + 5 * 60, //Expires in 5 minutes

    });


    console.log('Token: ', token);

    res

        .cookie('token', token, { httpOnly: true, expires: 5 * 60 * 1000 })

        .status(200)

        .send({ message: 'Login is successful' });

});


app.get('/welcome', (req, res) => {

    const token = req.cookies.token;

    if (!token) {

        return res.status(401).send({ message: 'Please login' });

    }

    try {

        jwt.verify(token, secret_key);

    } catch (err) {

        return res.status(400).send({ message: 'Authentication error!' });

    }


    res.status(200).send({ message: 'Have a good day' });

});


app.listen('8080', () => {

    console.log('Server is listening on port 8080');

});
Wrapping up
Although the tips mentioned above are easy and accessible to everyone, however, one should understand that by just adding JWT security into your API is not going to be enough.
Security is all about covering your fronts and just implementing one generic security scheme.
So, adding an extra layer of security with JWT to secure all your network traffic with an HTTPS connection will ascertain that whatever user sends and receives goes through decided secured port.