

Regardless of your position on either side of the web, there is always risk of being a victim of a cyber attack. This has put businesses in a tizz to make personal data of the visitors secure.
Enter Google.
Google offers a SAML-based Single Sign-On (SSO) service which secures and supports its partner companies with full control over the authorization and authentication by acting as an identity provider to validate users.
SSO fixes major problems of the large and small enterprises by providing-
- Greater security and compliance
- Enhanced usability and employee satisfaction
- Reduced IT costs
This secure single sign-on also helps the user significantly trust the security of online companies while also saving their time. There are other existing open source and commercial identity provider solutions, like OneLogin, Centrify Identity Service, & Microsoft Azure Active Directory, that can help you implement SSO.
One of our clients wanted to make their app accessible via SSO using Okta. Since their website was built on top of Drupal 8, in this blog we will illustrate the methods of SSO implementation on a Drupal website. We will also explore how individuals can manage various usernames and passwords.
Pre-requisites
- SimpleSAMLphp as the Service Provider (SP)
SimpleSAMLphp is the robust and complete implementation of SAML (Security Assertion Markup Language) in PHP. Its integration with Drupal makes it possible for the Drupal website to communicate with SAML for authenticating users. Post the successful integration, the Drupal website acts as a SAML service provider (SP). - Okta as the Identity Provider (IdP)
Okta provides an ability to have SSO access to the cloud, on-premise, and mobile applications. Users can sign-in to different web apps using their Okta credentials, thus eliminating the need to sign-up for different accounts and manage multiple credentials. Okta establishes a secure connection with the user’s browser and then authenticates the user to Okta-managed apps. - Drupal 8 website
Ready? Now let's dig in!
In 4 Steps, Implement Single Sign-on on Drupal Website
Follow the below-mentioned steps to implement SSO. The following steps are for installation with vanilla Drupal.
#Step1: SimpleSAMLphp installation on Drupal 8 website:
1. Using composer, download the Drupal contributed module for SimpleSAMLphp. This will fetch all its dependencies. We will enable this module later.`composer require drupal/simplesamlphp_auth`2. In your Drupal website’s root directory, create a symbolic link to the web-accessible directory of the SimpleSAMLphp library, which is downloaded in the site’s vendor directory upon successful execution of the above composer command.
`ln -s vendor/simplesamlphp/simplesamlphp/www .` // (ln -s path/to/original/ path/to/link)3. Add the following lines to the existing `.htaccess` file in the site’s root directory:
# Allow access to simplesaml paths.

RewriteCond %{REQUEST_URI} !^/simplesaml
`/simplesaml` is the path where we will have the SimpleSAMLphp installed on the Drupal website. This is the default path in the config file and can be modified as per preference.
‘secret_salt’ => ‘anyrandomvalidstringofanylength’

‘auth.adminpassword’ => ‘mypassword’
The `auth.adminpassword` will be used to login as administrator in the SimpleSAMLphp installation. The `technicalcontact_name` and `technicalcontact_email` can also be specified to receive error logs during installation.
SimpleSAMLphp must be configured to use something other than the “phpsession” (default) for session storage. The other alternatives are “memcache” or “sql”. The simplest solution would be to set:
‘store.type’ => ‘sql’

‘store.sql.dsn’ => sprintf('mysql:host=%s;port=%s;dbname=%s', '127.0.0.1', '', 'dbname')

'store.sql.username' => 'root',

'store.sql.password' => 'root',
5. Now, we can visit site.base.url/simplesaml which will display the SimpleSAMLphp installation page upon successful installation as shown below:
-2.png?width=512&name=unnamed%20(1)-2.png) #Step2: Setting up Okta application:
#Step2: Setting up Okta application:
For this, visit okta.com and log in using the company’s / client’s sign-in URL (considering that you are setting up Okta for your company or client). If you just want to try it out as a developer, then you can create a test account at developer.okta.com which will provide you with a test Okta domain (similar to your company’s or client’s okta domain).
Once you have successfully logged in, follow the below steps to add and set up a new application for your Drupal website in Okta:
1. Post login, the displayed screen is the default Developer Console, which needs to be switched to ‘Classic UI’ by hovering on ‘Developer Console’ in the Top-LHS bar. Click on the ‘Add Applications’ option in the RHS Shortcuts section.
2. Click on ‘Create New App’. Let the Platform option be Web and Sign-on method as SAML 2.0 and click Create.
3. On the next screen of General Settings, specify the metadata for the new app like name, logo and other visibility options. (This metadata will be used to display the app to the users in their Okta dashboard.)
4. A form would be displayed on the next screen which would generate the XML needed for the app’s SAML request.
a. Single Sign-on URL: The location where the SAML assertion is sent with an HTTP POST. This is often referred to as the SAML Assertion Consumer Service (ACS) URL for your application. This can be found under the Federation tab in the SimpleSAMLphp installation on the Drupal website. Click on Show metadata and look for AssertionConsumerService with HTTP-POST binding. The URL in the Location is the Single Sign-on URL value and is usually this:
http://local.test.com/simplesaml/module.php/saml/sp/saml2-acs.php/default-sp`
Keep the ‘Use this for Recipient URL and Destination URL’ checkbox marked.
'Allow this app to request other SSO URLs’ can be selected if we need to add SSO URLs for dev, stage, and prod instances (separate text boxes will be provided to enter multiple URLs). Although multiple URLs are supported but when users will try to access the app via their Okta dashboard, then only the default SSO URL will be used (recommended to add the production instance URL, once the SSO implementation is live, whereas while testing on local we can add the local instance URL as shown above).
b. Audience URI (SP Entity ID): The application-defined unique identifier that is the intended audience of the SAML assertion. This is most often the SP Entity ID of your application. This can be any relevant unique string (for eg.: okta_sso_drupal).
c. Rest all fields along-with those in Advanced Settings can be kept as default.
d. Attribute Statements: Although this is optional, however, specifying an attribute here will help while configuring the Drupal module as these attributes are passed to Drupal site from Okta post successful authentication. Specify Name as ‘email’, Name format as ‘Basic’, and select Value as ‘user.email’. That’s it, click on Next and then fill in some relevant feedback for Okta and then click Finish.-1.png?width=512&name=unnamed%20(2)-1.png)
5. Now, you will be redirected to the Sign On tab having a ‘View Setup Instructions’ button. Clicking on which a new browser tab will open with the information needed for the handshake between SimpleSAMLphp and Okta.
a. Identity Provider Issuer (Entity ID of the IdP)
b. IDP metadata (needs to be added at the SP end)
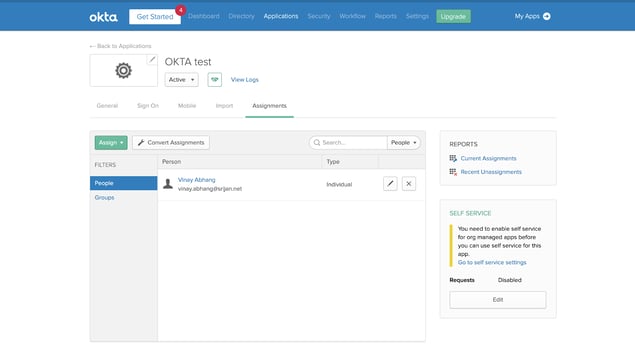
Assigning the Application To the Users:
Once we have successfully set-up our application in Okta, we need to assign users to the application. This can be done by navigating to the Assignments tab in the application setup and clicking on Assign.
 #Step3: Integrating SimpleSAMLphp and Okta
The entity ID and metadata of the IdP obtained from the Okta needs to be added to the SP (SimpleSAMLphp installed Drupal).
1. In the Drupal codebase, update the ‘entityID’ and ‘IdP’ values for default-sp in the $config array in'entityID' => 'okta_sso_drupal', // Needs to be same as Audience URI or SP Entity ID specified in Okta.
'idp' => 'http://www.okta.com/exk25jyaqjm3wRz22357', // Identity Provider Issuer or the Entity ID of the IdP obtained from Okta.
As the name suggests, the default-sp is the default one. Similarly, we can add multiple SP configured with different IdP as different keys in the $config array.
2. For adding the IdP metadata, copy the relevant templates available from the `vendor/simplesamlphp/simplesamlphp/metadata-templates` folder to the `vendor/simplesamlphp/simplesamlphp/metadata` folder (in this case, the file is saml20-idp-remote.php, since we are using SAML 2.0 and we need to specify metadata for remote IdP - Okta).
3. Since the obtained IdP metadata is in XML format and we need to add it in PHP, we will need to parse it. This can be done by navigating to our SimpleSAMLphp installation on our Drupal site and clicking on ‘XML to SimpleSAMLphp metadata converter’ under the Federation tab. (Administrator login is required for this, the username is admin and password is the one specified in ‘auth.adminpassword’ in config.php file.)
4. Copy the XML IdP metadata and paste it in the text area, click Parse and then copy the converted metadata in the PHP format and paste it in the `vendor/simplesamlphp/simplesamlphp/metadata/saml20-idp-remote.php` file.
5. Now check if the handshake is successful by clicking on the ‘Test configured authentication sources’ link under the Authentication tab in SimpleSAMLphp installation. There will be two options - admin and default-sp as defined in `authsources.php` file, click on default-sp and you will see a screen similar to the following one:
-1.png?width=512&name=unnamed%20(3)-1.png) The above screen means the handshake between SimpleSAMLphp and Okta is successful.
The above screen means the handshake between SimpleSAMLphp and Okta is successful.
STEP 4: Enabling SSO on Drupal site:
Now that we have SimpleSAMLphp installed on our Drupal site and we are done with the Okta application set up along with a successful handshake between both, we can enable SSO on our drupal website by enabling and configuring the contributed drupal module - simplesamlphp_auth which we have already downloaded.
1. Install the module through the UI or via Drush:Enabling the module by default will change the ‘Who can register accounts?’ setting to Administrators only which can be changed as per the need here: `/admin/config/people/accounts`
3. The module can be configured based on your requirements and has descriptive help texts for each config to understand its purpose. We will see some of the configs that need to be configured or taken care of:
a. Basic Settings:
-
-
- The ‘Activate authentication via SimpleSAMLphp’ checkbox should be only checked once we are completely done with the module configuration, as checking this checkbox would disable default Drupal user login for all users except the superuser (uid: 1).
-
The Authentication source is what we defined in `vendor/simplesamlphp/simplesamlphp/config/authsources.php` file, which is by default - default-sp.
- Federated Login Link Display Name is the link text for the SSO link which is displayed on the default login page of the Drupal website (/user/login).
-
- Local authentication means allowing users to log in to the site via drupal authentication (/user/login).
- By default, superuser or user with id: 1 is allowed to log in with local drupal accounts. We can configure it to allow for particular users by specifying their user ids or for particular roles.
c. User info and syncing:
- We have configured an `email` attribute in the Okta application which is sent to drupal site post successful login. We can configure different attributes in Okta which can be used for module configuration in Drupal, but since we have only the `email` attribute we will use it for:
- SimpleSAMLphp attribute to be used as a unique identifier for the user
- SimpleSAMLphp attribute to be used as the username for the user
- SimpleSAMLphp attribute to be used as an email address for the user
5. All the other configurations can be kept as is and now we can enable the ‘Activate authentication via SimpleSAMLphp’ checkbox under Basic settings.
That’s it. Now, we can add SSO into our Drupal site by visiting the default login page (/user/login) and clicking on the ‘Federated Login’ link as seen in the screenshot below:-1.png?width=512&name=unnamed%20(4)-1.png)
Summing Up
Single sign-on offers great user experience, productivity, and cost-saving benefits. By implementing it, your organization can increase the business’ capability to respond and securely deliver a convenient and seamless user experience throughout your apps and other domains.